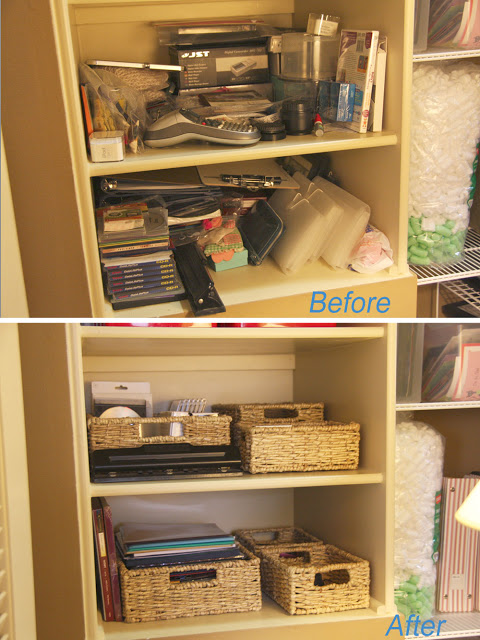
clearly, you can see what a mess that was. and how great that was working for me – not! i couldn’t find anything small when i was looking for it – like crazy glue or my sharp scissors that i keep out of the kids reach.
the shelves were beginning to make me twitch. 🙂
it was driving me crazy, but i also didn’t want to make a quick decision on how to solve the issue. i spent time looking at different bins and baskets. i wanted baskets that were deep enough to utilize all of that 24″of space. each time i went to Target or our variety of local craft stores, i would browse through their bins and basket departments. finally, last weekend, i found the perfect set of baskets at Michael’s – for 40% off too!…
why do i love these baskets?
*they have a handle on each side.
*they have a low profile on the top, which means i can see inside the baskets without having to remove them from the shelf.
*because i can see inside of them, there was no reason to create labels for each basket.
*they are simple (my style) and bring a natural element into an otherwise boring closet.
*they came in a variety of sizes.
*they were inexpensive, but are great quality and will last a long time.
in addition to the baskets, i had 4 plastic caddies that i purchased from target last year. i used the same caddies to gather up the kids art supplies (seen here). these caddies are awesome and useful!…and were only $2.50 each! i bought these knowing in the fall we would be adding the elfa shelving to this closet. so i was itching to finally put them to good use!….
now that i had my 2 solutions, i set them out on a table and got to work…
first thing was to empty the shelves and clean each shelf very well. they were full of dust!
then, i placed the empty baskets to make sure they would fit – and they do! yay!…(see what i mean by low profile? i can see right inside of the basket!)…
then, i created even more space by removing a bin of gift wrap items that had been sitting on top of the shelving. i moved that bin to new location in the closet and moved half of my big oversized scrapbooks up higher (i’ll be talking allllllll about those scrapbooks one day soon!). now i had 3 open shelves to work with instead of 2…..
next up – sorting through all of those “little things” and figuring out what to keep / how i was going to organize everything….
it’s shocking to me how much was stuffed onto those 2 shelves….
since i was knee-deep in “little things” and had the time set aside for this project, i figured i would go ahead and re-organize my 2 rolling bins as well…
these 2 bins fit perfectly under my project table in the closet. they are great to have on either side of me while i’m writing or working on scrapbooks. but the drawers were in desperate need of some love…
once i had it all laid out, i put my keeps into groups that made sense and started putting everything into a basket or caddy.
from left to right: cell phone accessories, DSLR camera accessories, scrapbook adhesives and label maker supplies….
one big basket of office supplies – like printer labels, report covers, and project files….
one big basket of blank CD’s, blank DVD’s, computer software, Bose chargers….
one basket of command adhesive supplies, blank DVD cassette’s, my label maker…
caddy on the left has post-it notes, staples, and binder clips. caddy on the right has wooden craft sticks and small note pads…
this caddy has pens, pencils and sharpies – will be up high out of reach…
and this caddy has scissors, stamps and stamp pads, and small scrapbooking tools….
these little scrapbook pieces really needed a home so that caddy makes great home for them!….
here are all of my newly re-organized rolling bin drawers. envelopes of all sizes…..
printing papers…..
ribbons….
stencils…..
glue gun and supplies….
die-cuts…..
finally, with everything put into caddies or baskets, it all went back onto the shelves….
the red caddies store what i would deem as “needs adult supervision” – which is why i placed them on the top shelf…
the baskets not only fit perfectly, but i love the natural look of them in this closet…


Great job! The transformation is awesome!!!
Anna
http://www.askannamoseley.com
thanks, anna!!
Bravo! This looks absolutely awesome! I would have kept opening the door too!!!
nadia – thank you, doll!
I leaped over from our Blogelina class….AMAZING transformation!! I'm very impressed. I need that level of organization. Love for you to see some of my past posts about the CHAOS in my home. There will be more like those again…soon!
http://www.scrapityanne.com
http://www.scrapityanne.etsy.com
thanks for stopping by, lynn! i'll be over to check out your site soon! i'm figuring i will love your site b/c it has "scrappily" in it…does that mean it's all about scrapbooking? i love to scrapbook!!!!
Way to go!! I have so many areas that I need to do this to. It looks great! Come by and visit me sometime if you want! http://www.mariahscreations.blogspot.com
hi mariah! thank you for the sweet comment! i WILL come by and visit your site…right after i click "publish" on this reply to you. thanks again!!!
what an awesome transformation! I just posted my linen closet redo but I like your baskets better! Isn't it amazing how many little things we end up with in live 🙂
hi heidi! thank you so much!
[…] corner is our office closet, which i recently redid with container store shelving (see here and here for […]